Digital - Week 7 - 27/03/2019
Starting the sticker book cover
Learning how to use mask and colour
For my front cover I wanted to do a demon mask inspired by two of my artist models styles. I also wanted to do it in the same colour pallet that they use, which is most commonly orange and reds. I also talked to my tattoo artist health about the masks, and he gave me great advice on how it should base the mask of a real mask to understand dimension and highlighting better and showed me the masks they had up in throne room tattoo parlor. He said they all use those masks as references when they design masks as tattoos. So when I do my sticker page on demons and mask I would reference real masks rather than looking at how they drew their masks. Mike (tutor) also recommenced this when I said I was going to do a mask for the cover of my sticker book. this was great he also showed me how to colour and use the masks properly as I didn't quite understand how they worked in the first place and how people used them for doing art. I just though people used different layers for everything, I didn't really know how masking worked in with that. So it was great that he showed me that because now I know and its makes the colouring process a lot faster and more convenient because there is less time erasing and perfecting keeping in the lines. I also wasn't to sure how to colouring photo shop I had done it before but nothing to xterm, I just new you had to put everything on different layers and different brushes had different affects.
I tried watching you tube tutorials on how to colour in Photoshop but it was quite over whelming because you could do it many ways but they never actually explained how they did it or go in depth why you do this or that which I thought was strange. So it was quite good that Mike sat down with me and showed me the easiest way to do colouring and it corresponds over to my Ipad in procreate.

So the easiest way to do it is colour section by section and go layer by layer.
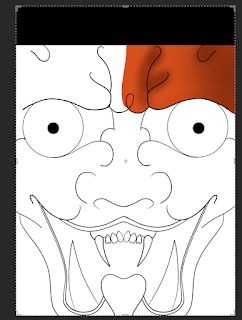
start with the line work and make sure it is the top layer because you want to colour under that layer.
My line work is quite simple there is not to much detail in the face and it is head on so picking a light source for this mask would be fairly simple because is isn't facing any weird angles.
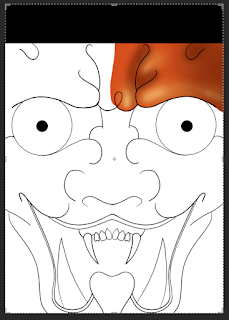
The second thing to do was to pick a light source, where was the light coming from? Mike recommend to make the lighting be under the face, so it seemed more 'scary'. So now I have my light source figure out now we have to map were the shadows and highlights are going to be.
Here is an example of a face with under lighting.
Now we can start colouring.

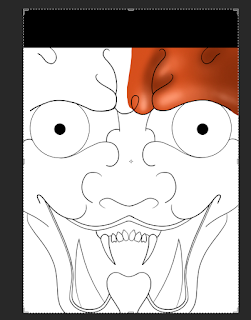
Once this is done make a new layer above the base colour right click the layer and press clipping mask.
You can now change the colour to a darker shade of the same colour or a different colour with in the colour rules. This will be our colour for shading. Using the reference of the under lighted face, shade the areas that will be darker and affected by shadow using a soft blurred brush and have transfer on.

Next create another layer above the shadows and make it a clipping mask as well. Pick a lighter colour and this will be out first highlight layer. The reason why I created two highlight layers is to have one soft highlight and one harsher highlight. Looking at the reference pick out the places on the face that will be reflecting light or covered by light. softly highlight those places with the same brush used for shading.
Create a new layer above the highlighter layer, right click and create clipping mask. Using the colour chosen for highlighting make it brighter. Using the same brush setting as before, add more highlight to the more promoter areas of the face that are affected by light.
Create another layer above this, right clip and create clipping mask. Using the same colour as the base cover the layer in that and using the layer type change the layer type until it fits the stylistic requirements that the colouring needs to fit.
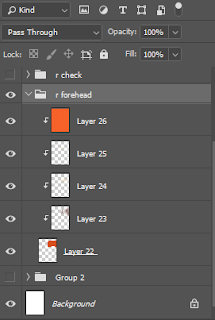
The layers section in Photoshop should look like something like this
This way of colouring is very useful as a beginner in colouring in Photoshop as its easy and quick to understand and pick up. Though I do think going section by section is a bit fiddly but is has a better pay of with the out come of the image and also can make it more persistence when it comes do detailing.
It is also helpful that this method of colouring not only works in Photoshop but works on my Ipad in Procreate. So I can use this method for my own personal work and keep learning how to colour and develop it more once I have gained the basic knowledge of how to digitally colour.
Learning how to use mask and colour
For my front cover I wanted to do a demon mask inspired by two of my artist models styles. I also wanted to do it in the same colour pallet that they use, which is most commonly orange and reds. I also talked to my tattoo artist health about the masks, and he gave me great advice on how it should base the mask of a real mask to understand dimension and highlighting better and showed me the masks they had up in throne room tattoo parlor. He said they all use those masks as references when they design masks as tattoos. So when I do my sticker page on demons and mask I would reference real masks rather than looking at how they drew their masks. Mike (tutor) also recommenced this when I said I was going to do a mask for the cover of my sticker book. this was great he also showed me how to colour and use the masks properly as I didn't quite understand how they worked in the first place and how people used them for doing art. I just though people used different layers for everything, I didn't really know how masking worked in with that. So it was great that he showed me that because now I know and its makes the colouring process a lot faster and more convenient because there is less time erasing and perfecting keeping in the lines. I also wasn't to sure how to colouring photo shop I had done it before but nothing to xterm, I just new you had to put everything on different layers and different brushes had different affects.
I tried watching you tube tutorials on how to colour in Photoshop but it was quite over whelming because you could do it many ways but they never actually explained how they did it or go in depth why you do this or that which I thought was strange. So it was quite good that Mike sat down with me and showed me the easiest way to do colouring and it corresponds over to my Ipad in procreate.

So the easiest way to do it is colour section by section and go layer by layer.
start with the line work and make sure it is the top layer because you want to colour under that layer.
My line work is quite simple there is not to much detail in the face and it is head on so picking a light source for this mask would be fairly simple because is isn't facing any weird angles.
The second thing to do was to pick a light source, where was the light coming from? Mike recommend to make the lighting be under the face, so it seemed more 'scary'. So now I have my light source figure out now we have to map were the shadows and highlights are going to be.
Here is an example of a face with under lighting.
 |
| https://movie-techniques.weebly.com/under-lighting.html |
Now we can start colouring.

First thing to do is to make a layer under the line work in a group folder. The base colour will be the bottom layer in this group.
Use the lasso tool and outline the area you want to be coloured, then use the pain bucket and click inside the area of the shape you made with the lasso tool.

Once this is done make a new layer above the base colour right click the layer and press clipping mask.
You can now change the colour to a darker shade of the same colour or a different colour with in the colour rules. This will be our colour for shading. Using the reference of the under lighted face, shade the areas that will be darker and affected by shadow using a soft blurred brush and have transfer on.

Next create another layer above the shadows and make it a clipping mask as well. Pick a lighter colour and this will be out first highlight layer. The reason why I created two highlight layers is to have one soft highlight and one harsher highlight. Looking at the reference pick out the places on the face that will be reflecting light or covered by light. softly highlight those places with the same brush used for shading.

Create a new layer above the highlighter layer, right click and create clipping mask. Using the colour chosen for highlighting make it brighter. Using the same brush setting as before, add more highlight to the more promoter areas of the face that are affected by light.

Create another layer above this, right clip and create clipping mask. Using the same colour as the base cover the layer in that and using the layer type change the layer type until it fits the stylistic requirements that the colouring needs to fit.

The layers section in Photoshop should look like something like this
This way of colouring is very useful as a beginner in colouring in Photoshop as its easy and quick to understand and pick up. Though I do think going section by section is a bit fiddly but is has a better pay of with the out come of the image and also can make it more persistence when it comes do detailing.
It is also helpful that this method of colouring not only works in Photoshop but works on my Ipad in Procreate. So I can use this method for my own personal work and keep learning how to colour and develop it more once I have gained the basic knowledge of how to digitally colour.


Comments
Post a Comment